Please remember we offer free design services if you upload images taken from our Light Panel to the web portal (see working with CAD files if you have .dwg, step, dxf or other files).
If you choose to design your own Foam Inlay or Shadow Board, the second step in the OSAAP workflow is to scan images into Blue Shadow. Please make sure to use a 16 MP camera. If you are using the Canon Powershoot that OSAAP supplies, CHECK THE SETTINGS before you begin to take the pictures
Tutorial Video:
Procedure:
To begin click the "Scanning" icon on the first page of Blue Shadow and browse to the location of the image you want to scan. It is best to scan images in directly from the camera to ensure that they are unaltered from the exact original.

Once the image is scanned, you will be presented with five different scoring methods:
- Photo 16 MP used: This represents the size of the original picture as a percentage of the 16 MP goal.
- Scanbord 16 MP used: This represents the amount of the picture inside the frame of the light panel that was scanned as a percentage of the 16 MP goal.
- Relative size used: This is the Scan board % divided by the Photo 16 MP % - which is a true indication of how well the image of the light panel was zoomed before taking the photo.
- Angle out of Center X: This scores how well you held the camera straight at 90° to the light panel in X
- Angle out of Center Y: This scores how well you held the camera straight at 90° to the light panel in Y
Each of these characteristics have an acceptable rate tolerance. If they do not fit in the tolerance a new picture will be required.
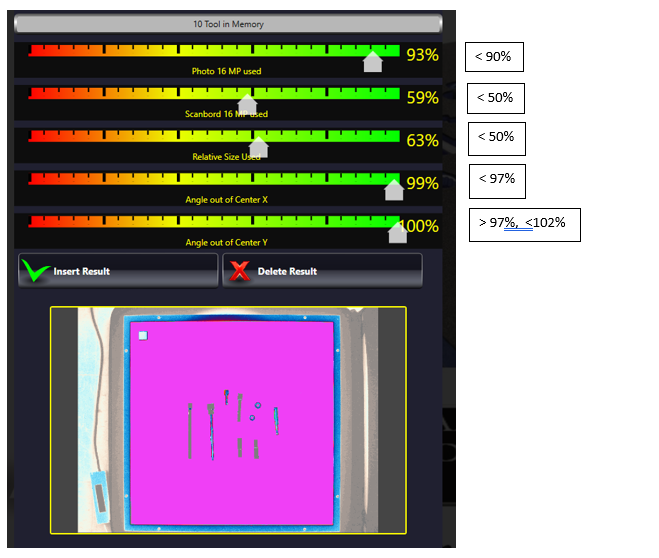
The Scan board % is the key value to inspect. This value represents how much you zoomed in on the picture. The more you zoom in, the more MP of the picture are inside the frame of the light box, which results in more MP used when scanning the board.
NOTES:
- If you are using a 16 MP camera (as recommended), then 50% Scan board equals an 8 MP result, which is the minimum for an acceptable scanned image.
- New smartphones have cameras ranging from 8 MP to 41 MP. There are many options of 16 MP cameras (even in smartphones), so search for the MP of available smartphones.
- Using a camera with higher than 16 MP adds more safety margin to how much you have to zoom in on the light panel before taking the picture.
How Do I know If my Tools are Scaled Correctly?
Do you have Gauge blocks in your scan?
Gauge blocks are used as reference measurements to make sure the cutouts for the tools are the correct dimensions.
A quarter is a very tight tolerance item and can be used as a gauge block. If you want to use a quarter as a gauge block you can use this website to find the dimensions.
A ruler is also a great gauge block because the measurements can be found on the image itself.
Anything can be used as a gauge block as long as you measure it first, however, make sure to remove your gauge block from your design before sending it to us. If you do not remove the gauge block or let us know that it is there it might accidentally be manufactured into the board.